Grensesnitt: Forskjell mellom sideversjoner
(→Bynavn) |
|||
| Linje 146: | Linje 146: | ||
{|class=wikitable style="text-align: center;" | {|class=wikitable style="text-align: center;" | ||
|- | |- | ||
! width=100px| | ! width=100px|Bilde | ||
! width=200px| | ! width=200px|Navn | ||
! width=400px| | ! width=400px|Beskrivelse | ||
|- | |- | ||
|[[file:Notes.png|center|link=]] | |[[file:Notes.png|center|link=]] | ||
| | |Merknader | ||
|This button will open up a notepad where you can write and save a message. Note that this is a Premium feature, you must have the Administrator activated in order to use it. | |This button will open up a notepad where you can write and save a message. Note that this is a Premium feature, you must have the Administrator activated in order to use it. | ||
|- | |- | ||
|[[file:Inventorybutton.png|center|link=]] | |[[file:Inventorybutton.png|center|link=]] | ||
| | |Inventar | ||
|Click here to open your inventory. You are able to story rewards from island quests and special events here for future use. See the [[Inventory]] Page for more info. | |Click here to open your inventory. You are able to story rewards from island quests and special events here for future use. See the [[Inventory]] Page for more info. | ||
|- | |- | ||
|[[file:Overviews.png|center|link=]] | |[[file:Overviews.png|center|link=]] | ||
| | |Oversikt | ||
|This button will open up the [[Premium|advisor overviews]]. You must have Administrator activated in order to see these menus. They provide information on all of your cities and it makes running a larger empire fairly simple. | |This button will open up the [[Premium|advisor overviews]]. You must have Administrator activated in order to see these menus. They provide information on all of your cities and it makes running a larger empire fairly simple. | ||
|- | |- | ||
|[[file:Units Training.png|center|link=]] | |[[file:Units Training.png|center|link=]] | ||
| | |Rekruttering | ||
|This will give you details on all of the units currently being trained in the currently selected city. | |This will give you details on all of the units currently being trained in the currently selected city. | ||
|- | |- | ||
|[[file:TroopMovement.png|center|link=]] | |[[file:TroopMovement.png|center|link=]] | ||
| | |Troppekommandoer | ||
|This will give you details on all of the troop movements in and out of the currently selected city. | |This will give you details on all of the troop movements in and out of the currently selected city. | ||
|- | |- | ||
|[[file:TradeMovements.png|center|link=]] | |[[file:TradeMovements.png|center|link=]] | ||
| | |Handelskommandoer | ||
|This will give you details on all of the trade movements in and out of the currently selected city. | |This will give you details on all of the trade movements in and out of the currently selected city. | ||
|- | |- | ||
!colspan=3| | !colspan=3|Angrep | ||
|- | |- | ||
|align="center"|[[File:NoAttack.png]] | |align="center"|[[File:NoAttack.png]] | ||
| | |Ingen. | ||
|align="center"| This is the default state of the attack icon. | |align="center"| This is the default state of the attack icon. | ||
|- | |- | ||
Sideversjonen fra 2. des. 2013 kl. 20:28
|
|
Under vil du få all den informasjonen du trenger for å kunne navigere deg gjennom vårt grensesnitt. Nummerene ved siden av innleggene vil passe sammen med nummerene du vil kunne finne på oversikten undr. De er her for å hjelpe deg til å se hva du ser på!
Brukergrensesnittet
Under her kan du finne mer informasjon om hvordan det nye grensesnittet fungerer:
Som du kan se fra bildet over, har kartet fått størsteplassen av plassen på skjermen. Via sidemenyene og toppmenyen vil en spiller få tilgang til all informasjon som er nødvendig for å kunne spille Grepolis.
Spillskjermen har blitt delt opp i tre menyer.
- Sidemenyen til venstre er området hvor en spiller får tilgang til nøkkelfunksjoner på spillet som allianseforum, rapporter og rangeringer. Du vil også kunne finne minikartet, eventuelle rådgivere du har aktivert og klokken her.
- Sidemenyen til høyre viser deg en oversikt over velviljen du har fått fra den spesifikke guden som du tilber i byen din, i tillegg til antall enheter i den byen (inkludert støtte) og dine rapporter.
- Toppmenyen viser deg en oversikt over bynavnet, angrepsvarslinger, knapper som gjør at du kan hoppe mellom byene, kommandooversikt og ressursene i byen (og dersom du har administrator aktivert, en hurtiglinje).
Det er også mulig å forstørre inn og ut for å kunne se mer av det lokale havet. For å gjøre dette holder du bare inne Ctrl + for å forstørre og Ctrl - for å minimere.
Venstremeny
Her vil du kunne finne informasjon om alle knappene på venstresiden.
Øverste del
Den øverste delen har i utgangspunktet blitt tatt opp av kartet og dets tidligere funksjoner, men du vil kunne finne antall gull her. Mer informasjon kan du finne under:
| Bilde | Navn | Beskrivelse |
|---|---|---|
| Stift til strategisk kart | Klikk på knappen for å komme til verdenskartet som vil gjøre det enklere å se på øyene rundt meg. | |
| Skift til visning av øyer | Klikk på denne for å fokusere kartet på kun en øy. Dette er standardvisning av kartet! | |
| Byvisning | Klikker du på denne vil du åpne opp din byoversikt. Herfra kan du rekruttere enheter eller konstruere bygninger. | |
| Hopp til nåværende by | Klikk på denne for å hoppe til den nåværende valgt byen. | |
| Fargetildeling | Klikk på denne for å endre farge på andre spillere og allierte. | |
| Lagre posisjon | Ved å klikke på denne får du muligheten til å lagre en plassering på kartet, dette blir lagt til i en droppmeny ved siden av sånn at du kan hoppe tilbake til den plasseringen når du ønsker. | |
| Hopp til disse koordinatene | Denne gir deg muligheten til å hoppe til koordinater som du manuelt skriver inn. | |
| Premium | Klikk på denne for å åpne opp vinduet hvor du kan kjøpe gullmynter. Ved siden av kan du se hvor mye gull du har. |
Du vil også kunne finne informasjon om rådgiverne og spillklokken::
Rett under minikartet er det en plass hvor du kan se hvilke rådgivere som du har aktivert. Dersom portrettet/bilde er grått så betyr det at den rådgiveren ikke er aktivert. Klikker du på noen av vinduene vil du få opp vinduet med rådgiverne. Dette gir deg muligheten til å velge hvilke rådgivere du ønsker å aktivere, eller eventuelt utvide utover de vanlige 14 dagene.
Spillklokken blir automatisk satt til GMT+1 (UTC+1) som er tidssonen til der serverne er plassert. Denne innstillingen kan du endre under innstillinger, men veldig mange spillere foretrekker å ha klokken på standardinnstillinger.
Nedre del
Den nedre delen av sidemenyen er for spillet, og herfra får du tilgang til nøkkelfunksjoner på spillet som meldinger, allianseforum og rangeringer.
| Bilde | Navn | Beskrivelse |
|---|---|---|
| Meldinger | Klikk på denne for å åpne opp meldingsvinduet. Herfra har du muligheten til å starte samtaler med andre spillere, men også større gruppesamtaler. Du kan også sjekke gamle meldinger her! Du kan blokkere spillere du ikke ønsker å motta medlinger fra om du ønsker det. Det er også mulig å opprette en mottakerliste sånn at du lett kan sende en melding til en gruppe spillere. Dette er også her hvor du kan finne offentlige meldinger fra Grepolis teamet. | |
| Rapporter | Denne knappen åpner opp rapporter. Du vil motta rapporter på ting som f.eks angrep (både angrep du har sendt på andre spillere og angrep som er mot deg), støtte, bruk av magi og når du har fått gullmynter inn på kontoen din. Du kan selv bestemme velge hvilke rapporter du ønsker å motta, i tillegg til å velge om du ønsker å se en animasjon eller ikke. | |
| Allianse | Denne åpner opp en allianseprofil. Dersom du ikke er medlem i en allianse, vil du kunne se invitasjoner til allianser her + i tillegg til å få muligheten til å opprette din egen allianse. Les allianser for mer informasjon rundt dette! Dersom du er medlem i en allianse, vil klikking på denne knappen åpne opp et vindu hvor du kan se interne kunngjøringer fra dine allianseledere. Du vil også kunne se en liste over begivenheter innad i stammen (som nye medlemmer, erobringer osv). Det er mange faner her, dersom du er en leder vil du kunne endre på innstillingene til alliansen (navn, banner, profil osv). Dersom du er et vanlig medlem vil du kunne se en liste over alle medlemmene og de alliansene dere har en pakt med. | |
| Allianseforum | Denne åpner opp allianseforumet som gir deg muligheten til å skrive med dine alliansevenner. Dersom du ikke er medlem av noen allianse, vil denne knappen bli mer usynlig og kan dermed ikke klikkes på. | |
| Rangering | Denne knappen åpner opp rangerlingslisten over den verden. Her kan du få en oversikt over følgende; spillere, allianser, havspiller og havallianser, spiller KP stats, allianse KP stats og Verdens Vidundre. | |
| Profil | Her kan du fikse din spillerprofil. Du kan også legge til et våpenskjold om du ønsker det. | |
| Inviter venner | Her kan du invitere venner til å spille Grepolis! De du inviterer vil dukke opp på samme øy som deg, eller i alle fall på en i nærheten og dersom de er helt ny på spillet vil du motta 200 gullmynter dersom den spilleren klarer å få 1000 poeng. | |
| Chat | Denne knappen åpner opp et lite samtalevindu, også kalt chat. Her kan du skrive med medlemmer av samme allianse som deg, og kun med de i din allianse som også er pålogget. Denne er svært nyttig dersom få er pålogget, men kan raskt bli stressende dersom mange prøver å skrive noe samtidig. | |
| Forum | Dette er en link til det offentlige forumet. Her kan du skrive med spillere som ikke nødvendigvis spiller på samme verden som deg selv. Du kan også stille spørsmål, komme med ideer og være med på konkurranser. |
Toppmeny
Toppmenyen gir spillere muligheten til å hente ut diverse informasjon ved bruk av ikoner. En spiller kan se navnet på den nåværende valgte byen, samt informasjon om innkommende angrep, handelskommandoer og antall ressurser som er i den byen.
Du kan finne bynavnet midt på skjermen i toppmenyen. Mange spillere velger å bruke et spesifikt tema når de navngir byene sine, mens andre foretrekker å ha et system som gjør det mulig å se hvilke byer som er i hvilke hav. Dersom du dobbeltklikker på navnet, kan en spiller endre bynavnet sitt. Klikker du en gang vil du åpne opp bylisten og du får muligheten til å velge en annen by uten å bytte mellom alle byene.
Pilen på hver side av navnet gjør det mulig for deg å bla igjennom dine byer, den går igjennom byene alfabetisk.
Andre knapper
| Bilde | Navn | Beskrivelse |
|---|---|---|
| Merknader | This button will open up a notepad where you can write and save a message. Note that this is a Premium feature, you must have the Administrator activated in order to use it. | |
| Inventar | Click here to open your inventory. You are able to story rewards from island quests and special events here for future use. See the Inventory Page for more info. | |
| Oversikt | This button will open up the advisor overviews. You must have Administrator activated in order to see these menus. They provide information on all of your cities and it makes running a larger empire fairly simple. | |
| Rekruttering | This will give you details on all of the units currently being trained in the currently selected city. | |
| Troppekommandoer | This will give you details on all of the troop movements in and out of the currently selected city. | |
| Handelskommandoer | This will give you details on all of the trade movements in and out of the currently selected city. | |
| Angrep | ||
| Ingen. | This is the default state of the attack icon. | |
| Attack Inbound! | When you have an incoming attack on any of your cities, the icon will appear like this and flash with the orange light behind it. It will also tell you how many attacks are coming. | |
| Attack Notification | When you are being attacked, not only will the notice light up, but this icon will appear in the lower right of the screen to let you know that there is an attack coming. | |
Resources
This shows how much of each resource are currently stored in the warehouse. You are also shown how much free population you have left.
Quick Bar
The quick bar, found under the top menu bar, is a premium feature that you can gain access to by activating the Administrator.
You are able to add links to buildings in order to get to them quickly.
In order to edit the quick bar, click on the little gear image on its left hand side.
Click on "new menu item" and then enter the name that you want to be displayed and the java code for that building. The codes can be found in this table:
| Name | Code |
|---|---|
| Senate | javascript: MainWindowFactory.openMainWindow () |
| Cave | javascript: HideWindowFactory.openHideWindow () |
| Warehouse | javascript: BuildingWindowFactory.open ('storage') |
| Farm | javascript: FarmWindowFactory.openFarmWindow () |
| Timber camp | javascript: LumberWindowFactory.openLumberWindow () |
| Quarry | javascript: StonerWindowFactory.openStonerWindow () |
| Silver mine | javascript: IronerWindowFactory.openIronerWindow () |
| Market place | javascript: MarketWindowFactory.openMarketWindow () |
| Harbor | javascript: DocksWindowFactory.openDocksWindow () |
| Barracks | javascript: BarracksWindowFactory.openBarracksWindow () |
| City wall | javascript: BuildingWindowFactory.open ('wall') |
| Academy | javascript: AcademyWindowFactory.openAcademyWindow () |
| Temple | javascript: TempleWindowFactory.openTempleWindow () |
| Agora (defence) | PlaceWindowFactory.openPlaceWindow ('index', open) |
| Troops Outside | PlaceWindowFactory.openPlaceWindow ('units_beyond', open) |
| Simulator | PlaceWindowFactory.openPlaceWindow ('simulator', open) |
| Culture | PlaceWindowFactory.openPlaceWindow ('culture', open) |
| Phoenician merchant | javascript:Layout.phoenicianSalesman.open() |
Right Bar
The right sidebar provides information about the god currently being worshipped in the city, a count of the total troops in the city and in the future, your Heroes control panel.
Buttons
There are a number of buttons at the top of the right menu bar, details on these can be fund below:
| Image | Name | Description |
|---|---|---|
| Settings Button | The settings page, customise things such as how many windows you can have open, whether or not the Night Graphics are enabled and change your password (you can obviously change many other settings though!) You are also able to submit support tickets from here. | |
| Sounds Button | Click here to open the settings for the Sounds. | |
| Wiki Button | A link to here! | |
| Log Off | Log off your current world. | |
| Spells Button | Opens a menu from which you will be able to cast spells (if you have enough favour). |
God and Favour
The upper right corner of the sidebar gives a portrait of the god being worshipped in the selected city. The amount of favor a player has will be given under the portrait.
By clicking on the image of the lightening bolt, you will be shown a list of the spells that can be cast on that city. All spells for all gods being worshipped will be available. You will only be able to cast spells if you have enough favor.
Units
Underneath the portrait of the worshipped god, is displayed the troop indicator. Troops shown here are also inclusive of support troops currently stationed in the city. There are also links to the barracks and harbour.
Notifications
You are provided with a constant stream of Notifications on the right hand side of your map. You get notified about many things here, these are:
- Building-work completion
- Trade
- Divine Powers
- Messages
- Reports
- Attack planner warnings
Main Screen
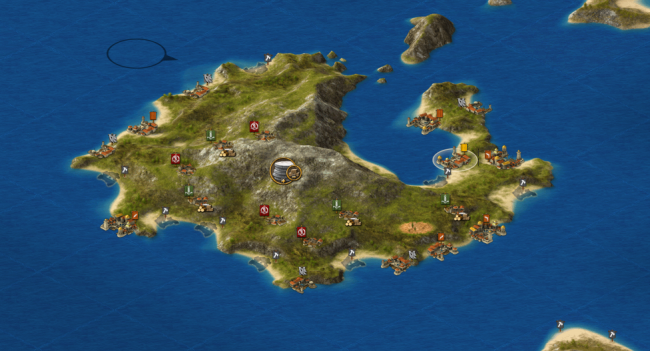
The main bulk of your screen is the play-area. When all windows are closed, you will see your island, you can click and drag to navigate around the world (or switch to the World View to make it a bit easier). It is in this view that you are able to interact with other players as well as NPC Farming Villages.
 |
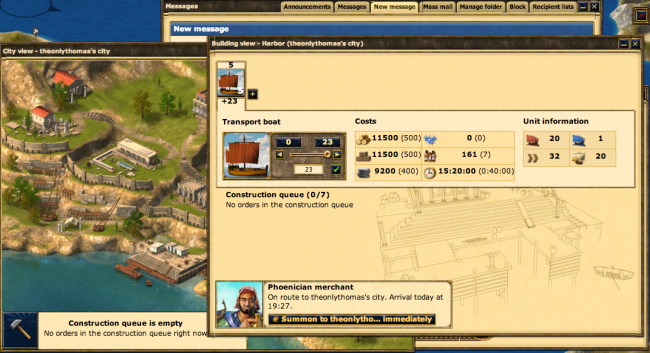
When you click to open a window, it will open like a pop up. You are able to have up to 10 windows open at once (you can control this limit in the Setting menu) and can click and drag to move them around. Clicking the red 'X' in the top right of this area will close all of the windows.
 |
Map Details
There are a number of details which appear on the map, most of which are specific to the island on which your city is located.
Øydetaljer
In the center of each island, there is an icon which describes the fertility of the island's resources. There will be one resource which is more abundant than the others, and one resource which is more scarce than the others. Adapting your build strategy to these changes in resources will help to improve your ability to get your city up to speed quickly.
- For instance, if you have a +silver and -wood island, having Poseidon as your worshipped god and taking over the villages which trade for wood will be helpful in the early stages of the game.
| Icon | More | Less |
|---|---|---|
| Wood | Stone | |
| Wood | Silver | |
| Stone | Wood | |
| Stone | Silver | |
| Silver | Wood | |
| Silver | Stone |
City Details
- It is also possible to assign colors to players and/or alliances so that only you see them in this new color. You can do this by clicking on a city, select Info and next to the player's name/alliance there is a little colored box. It is there that you can select a new color for them.
Like the way in which your buildings change and evolve, so too will your city on the map. As you increase in points, the city will grow larger and appear more grand in comparison to other cities.
| City Expansion | ||||
|---|---|---|---|---|

|

|

|

|

|
| 0-599 points | 600-2,399 points | 2,400-5,399 points | 5,400-9,999 points | 10,000+ points |
City Options
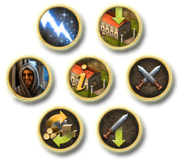
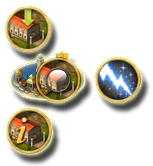
When you click on a city controlled by another player, you will be given 7 options to chose from. These options include peaceful actions, and hostile actions.
- Note: Abandoned cities will only allow you 5 of these options.
In the left hand column in the table below you will see two menus. The one on the top is the menu that you are presented with when you click on another player's city, the one on the bottom is the menu you are presented with when you click on one of your own cities.
| Menus | Option | Description |
|---|---|---|
|

|
Provides information about the current owner and alliance of the city. |

|
Opens the City Overview of the city. This replaces the Info Button if you control the city. | |

|
This allows you send troops and/or ships to help another player defend their city. | |

|
This will open up the attack window and allow you to determin what troops to send when attacking the city. | |
|

|
When you have a market built you will be able to trade with other cities. Not available for Ghosts. |

|
Once you have a temple built you can enact spells provided you have enough favor. Not available for Ghosts. | |

|
After you have built a cave you can use this to send spies provided you have enough silver. | |

|
This will center the map over the city you are looking at. |
Clicking on an empty anchor spot on the map will present you with two options:
| Button | Description |
|---|---|
| Click here to open the colonisation menu, from here you are able to send a Colony Ship to Colonise the empty anchor point. | |

|
Click here to invite friends who do not already play in your world. If they are not already playing other worlds, and so are completely new players, you will be rewarded with 200 gold if they reach 1000 points. |
The island view is easily moved and you can drag and drop it to get a better view. It allows you to move your map around to see neighbouring islands. It is quite easy to use as long as the distances are not too great.
World Map
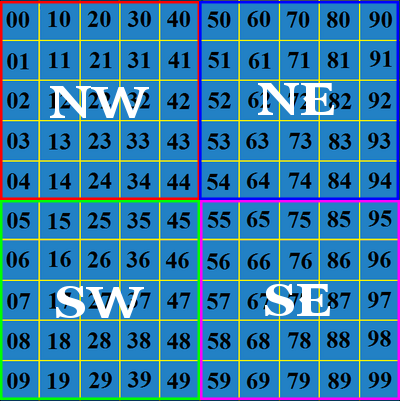
The world is divided into 100 oceans in a grid layout, and each ocean is numbered from 0-99. The number of the ocean correspond to the (X,Y) location in the world. The first number is the beginning of the X coordinate, and the second number is the start of the Y coordinate.
In addition to the oceans, the world can be divided into 4 quadrants which correspond to the ordinal directions on a compass. They are in clockwise order: NE (Blue), SE (Purple), SW (Green), and NW (Red). The direction in which you choose when you join the game will impact on what alliances are located near you.
The world can also be divided into regions: Core Oceans, Expansion Oceans, and The Rim. Many players agree that the Core is made up of Oceans 44, 45, 54, and 55 as they are located in the exact center of the world. The Expansion Oceans are those which surround the Core. The exact number of these oceans depends on the world and how active it is. Beyond the Expansion Oceans is The Rim. New players and those players who have lost all of their cities or restarted will be found here. As more players join or others are conquered, The Rim moves further out towards the edges of the world.


